Yes, the title is not lying, although I must admit it’s a bit clickbaity ;)
This is a post on how I made NitroEdit, the first ever Nintendo DS homebrew made to edit other Nintendo DS ROMs.
A preamble on ROM-hacking
You’re probably familiar with game ROMs, which are just raw dumps of the contents found on game cartridges as binary files that you can play on flashcarts or on DS emulators. Once you have a game ROM on your hands, you can play it (as Miyamoto intended), or you can better spend multiple afternoons exploring the guts of the game contents.
Broadly speaking, games contain two fundamental types of data: the game code and the game assets (2D textures, 3D models, dialog texts, sound effects and so on). Depending on your interests, you may want to disentangle the game code in the hopes of making modifications to existing mechanics (the fine art of code disassembling) or maybe even replicating the entire game by yourself (full decompilations, the holy grail of reverse-engineering a game, which was famously achieved with Super Mario 64 after a lot of collective effort), or you may just want to play around with the game assets to create re-skinned or expanded versions of the game (the art of game modding).
I’ve played around with both game modding and disassembling. In fact, I have an ongoing reverse-engineering project with the game Super Scribblenauts, but that’s a topic for other future posts. I also spent some quality time reverse-engineering Mario Kart DS in the past, and created the only save editor ever made for this game.
Some great examples of so-called DS ROM-hacks are Mario Kart DS ROM-hacks, such as Ermii Kart DS or CTGP-Nitro.
In the case of Nintendo DS games, there are numerous PC tools used for either of these purposes (small reminder that the Nintendo DS family of consoles is already two decades old).
Exploring through game assets
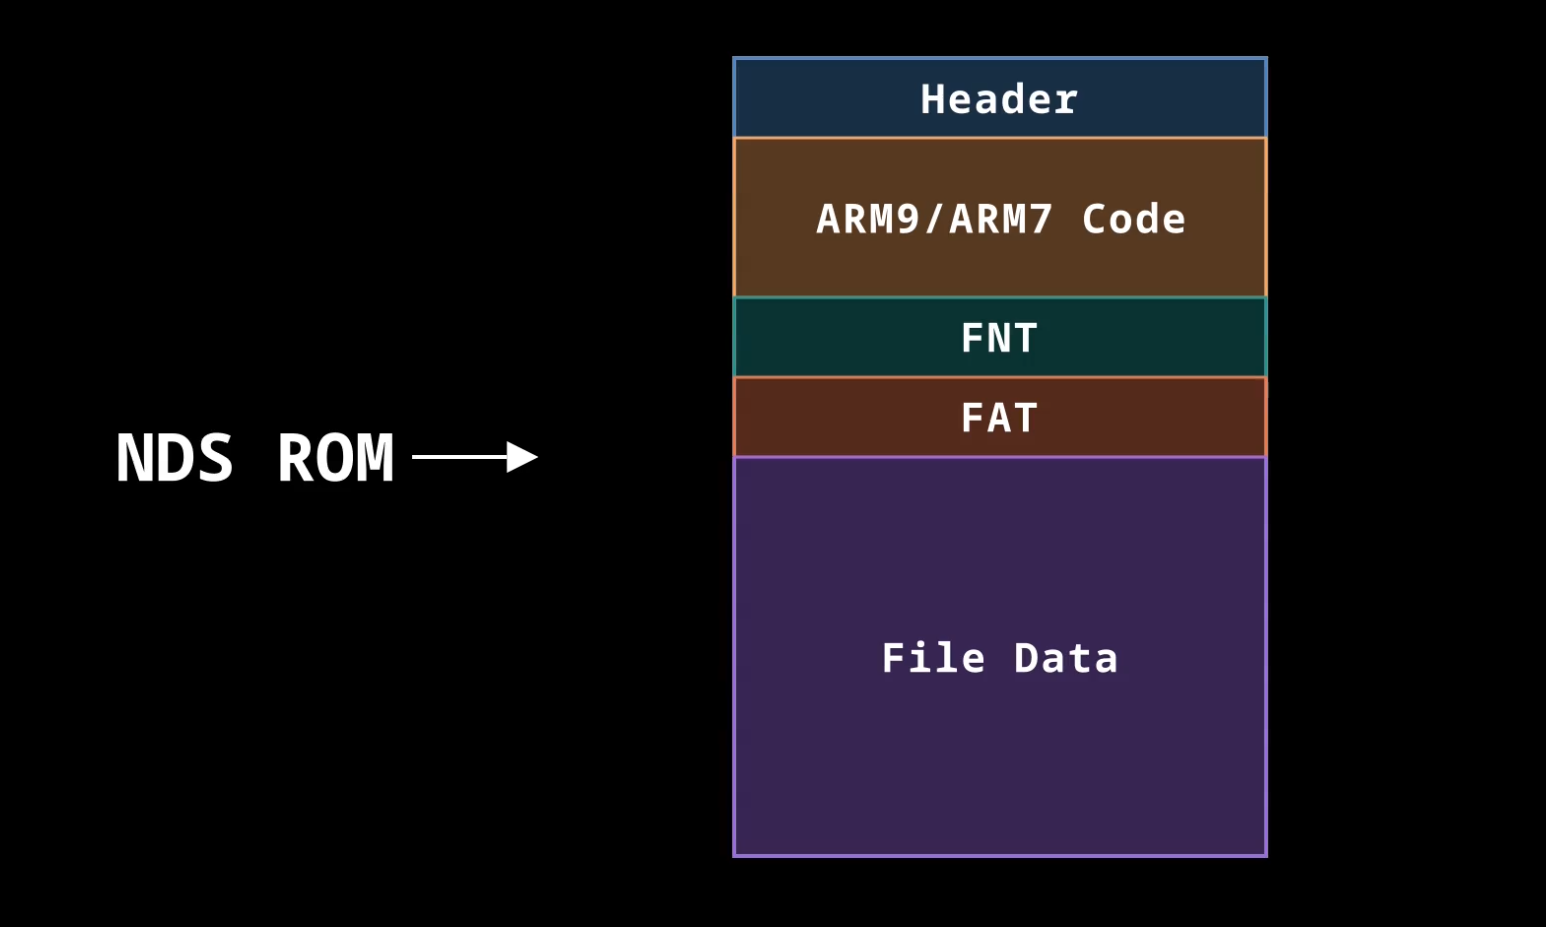
While early videogame systems used to embed graphics or sound assets together with the code as part of a big chunk of raw data (I recommend RVGM videos on Atari and other consoles of the same era), and while modern systems frequently use more complex filesystems containing file names and a directory structure (like the ones on your hard disks, or not too far from them), I’d say that the Nintendo DS sits somewhere in the middle, being more akin to old systems on certain aspects (it has no underlying OS, as games themselves access the relevant IO ports and manage concurrency and threading/scheduling/synchronization primitives themselves) and rather modern on several other aspects, such as the filesystem it uses to store game assets:
Commonly referred to as NitroFS, this filesystem relies on a File Name Table (FNT, containing the hierarchy of the filesystem, all file and directory names and attributes) and a File Allocation Table (FAT, containing locations of the raw data of all filesystem files) to encode a rather conventional filesystem.
It is not unusual for game developers to mistakenly save/forget to remove unintended files in their release game NitroFS, which can still be found by exploring their filesystems (yeah, I have spent some quality time doing that). This is definitely an interesting topic for another post ;)
The majority of existing Nintendo DS ROM-hacks have been made by using PC editors to modify game assets in their NitroFS filesystem (some are even cooler and have also made minor code modifications to the game, but this is a topic for another time). Since the Nintendo DS is already two decades old (damn) some of these tools have been used and maintained by the community for more than a decade already.
These are some noteworthy examples:
-
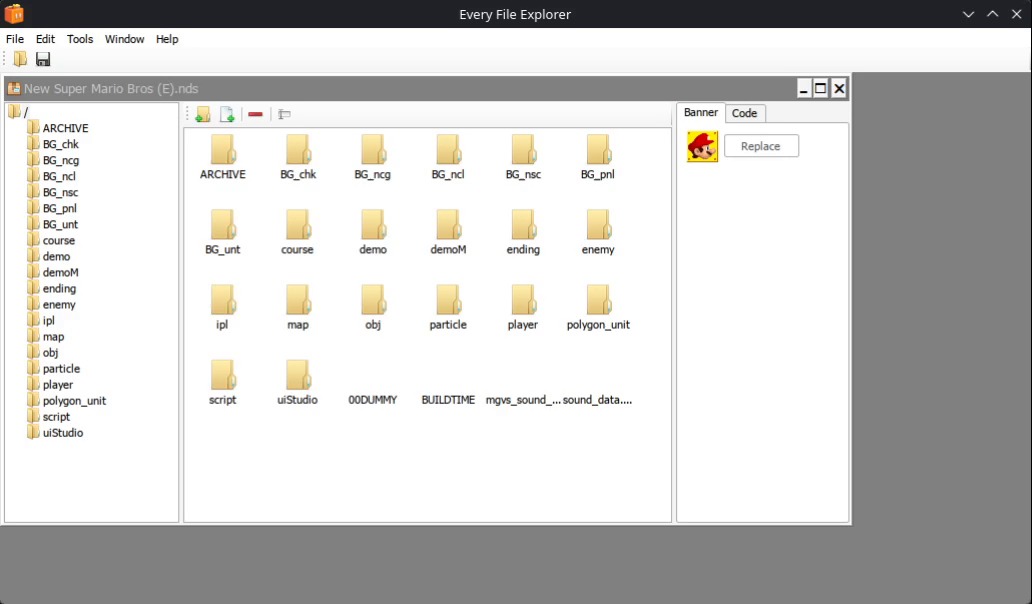
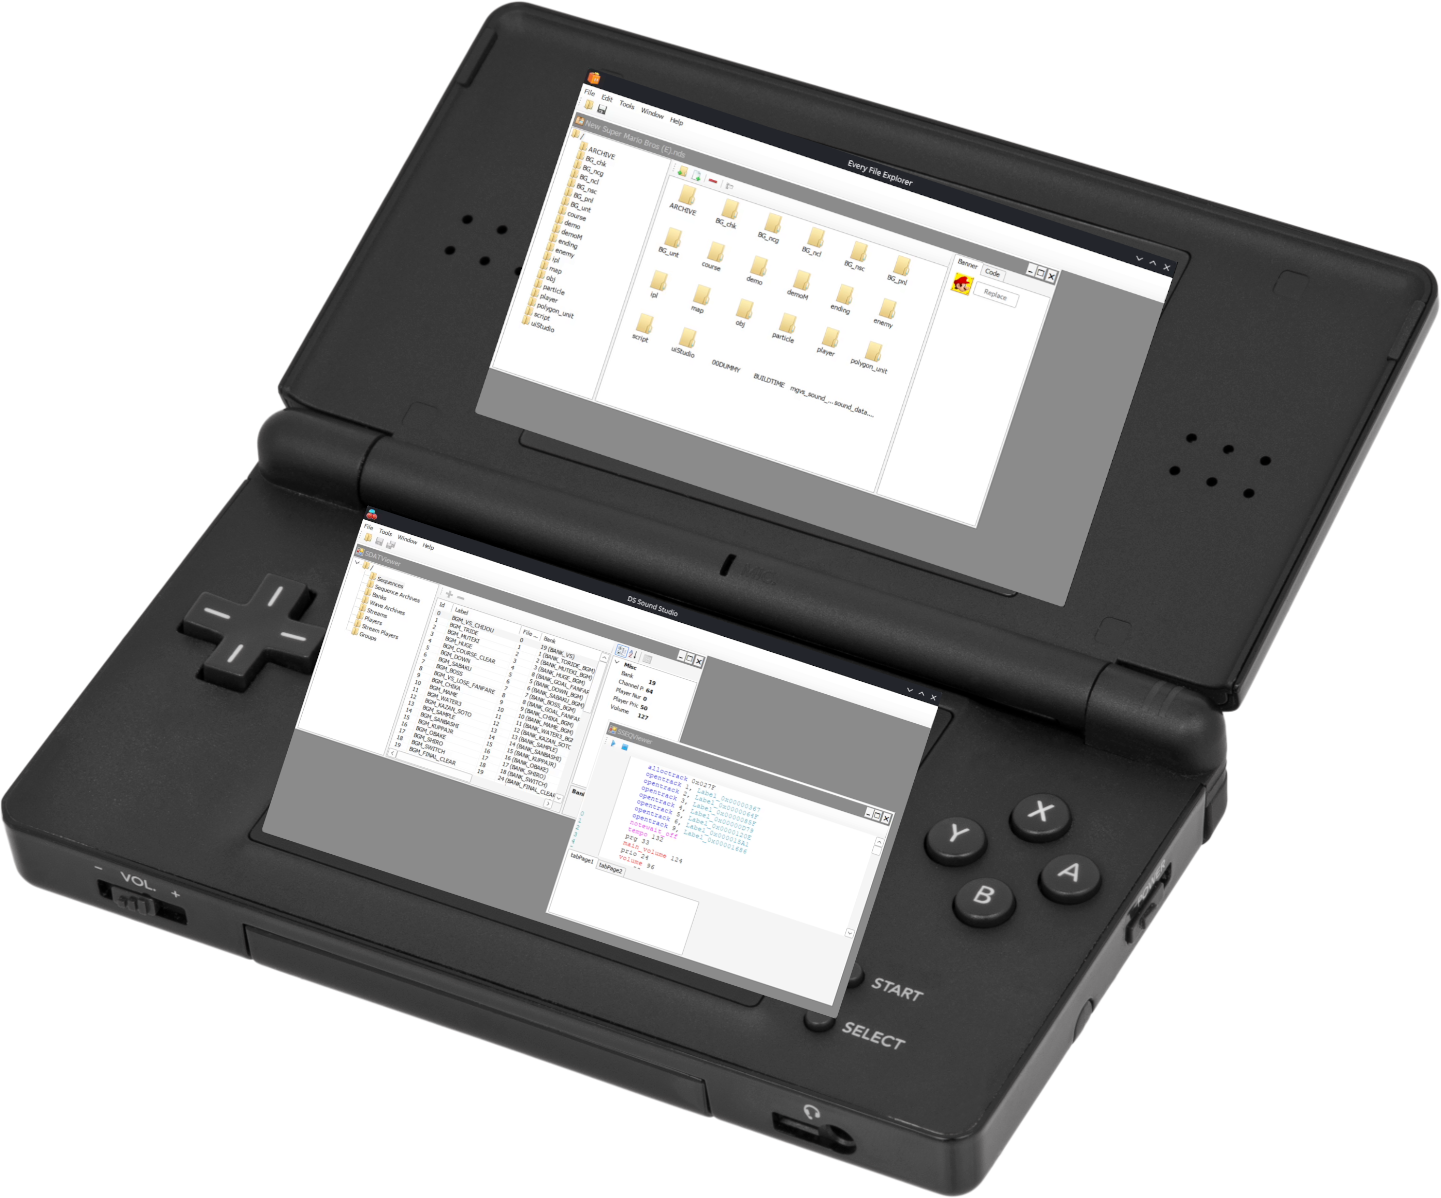
Every File Explorer, by Gericom: more of a multipurpose tool, supports several kinds of common formats found in games (even 3DS and other systems).
-
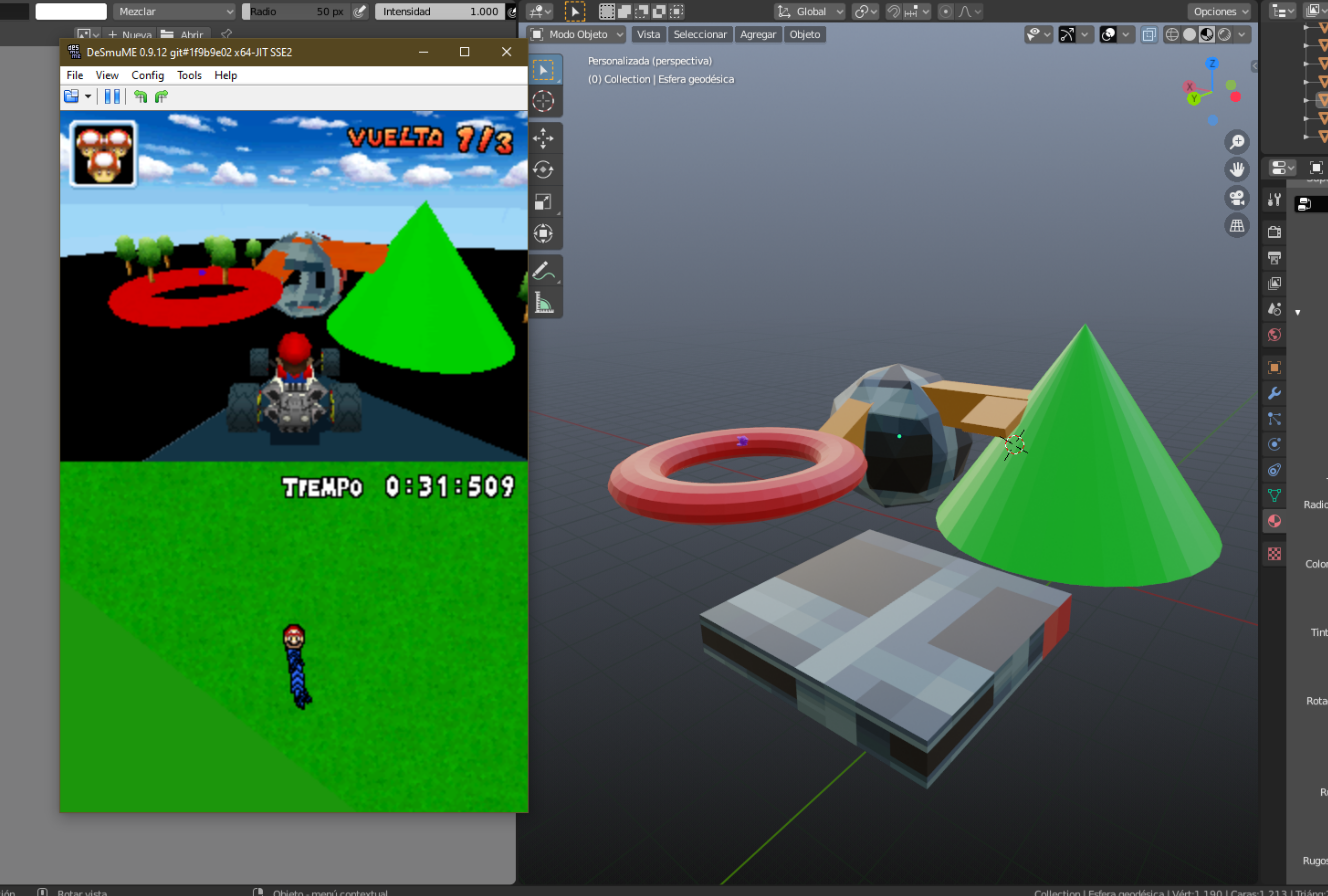
MKDS Course Modifier, by Gericom: more focused on Mario Kart DS-specific files (who would’ve guessed), particularly useful for editing and inserting custom 3D models and tracks (allows for proper editing of face collisions and many types of track properties).
-
NSMB Editor, by Dirbaio (here is an active fork): specially built for editing New Super Mario Bros. levels and assets, although it provides some generic browsing and texture support for any kind of ROM.
-
DS Sound Studio, by Gericom: best tool I’ve found for direct manipulation of SDAT files and other sequence and wave sound formats (we’ll later talk about sound asset formats).
-
VGMTrans: while not DS-specific, is a great tool for exporting SDAT contents into common audio formats like MIDI and SF2.

A dumb idea
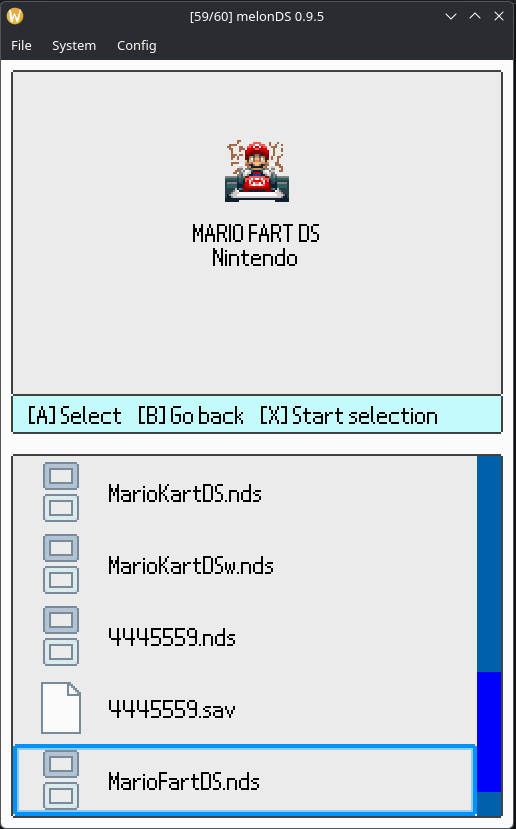
Editing a Nintendo DS ROM on your PC is all fine and dandy, but… what about editing a ROM on a Nintendo DS console itself? Picture yourself being in the middle of nowhere, away from any computer, only with your faithful Nintendo DS in your pocket. Imagine turning it on, opening some sort of editor, selecting your Mario Kart DS ROM, and changing the game title text to “Mario Fart DS”. Not only that, but you also draw some nasty fumes on the game icon and decorate the game title screen with all sorts of dumb drawings. You save the modified game, reboot the console, open it, and you’re greeted with your fine taste in logo design. Is this too dumb to even bother?
This is the sudden thought I had nearly 5 years ago. In the span of around 10 minutes, as I glossed over technical details of making such an editor in my head, the idea went from “too dumb to even bother” to “too dumb that it might be possible, and fun enough to give it a shot”. The following days of focused development were undoubtedly a fun experience.
Contemplating the challenge
First things first, how do PC ROM editors work? The answer is as boring as it is straightforward: they just load the entire ROM in memory, so that changes in ROM files are just a matter of modifying data structures in code, and after the editing is done, the entire ROM is repacked and saved as a new binary file. This already poses two remarkable problems.
First of all, how can we even open, read or write files within a Nintendo DS? What does it even mean to load a ROM file in this context? For the sake of this work, I found reasonable to limit the scope to the filesystems that ROM flashcarts have (or similar contexts of DS ROM loading like the amazing TWiLight Menu++) where, thanks to DLDI patches, homebrew DS ROMs have R/W access to the same filesystem where they are located. This is directly supported through the libfat library, complementary of the standard libnds C homebrew library (more on the coding aspects later).
Next, let’s talk about DS ROM sizes. They range from a few tens of MB to a top size of around 512MB, although most of them probably lie in the 30-100MB range. Considering the amount of RAM that modern computers have, reading entire ROMs in memory is more than doable: even keeping several copies of them in memory wouldn’t be a problem.
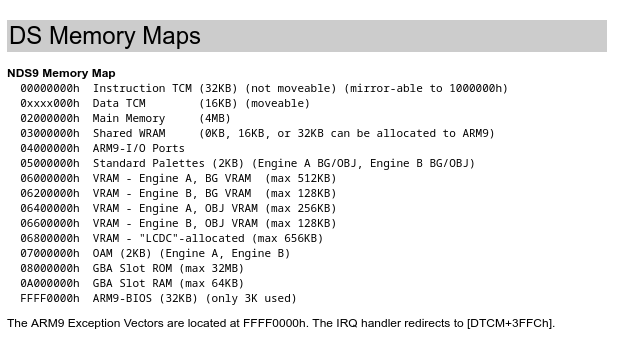
Want to take a guess at the RAM size Nintendo DS systems have? An astonishing 4MB. This is, in fact, a major challenge: how can we even dream of loading tens of MB of ROM data? Well, we may be asking ourselves the wrong question here. Being on a radically different platform, we don’t really have to follow the same principles of PC editors, do we?
An alternative editor approach
Our goal is to read some game asset, modify it in some way, and then save the modified asset file back into the ROM. A key insight here is that the typical asset file inside the NitroFS is small, or at the very least manageable, even with the small RAM we have. After all, we may only be modifying one file at a time: first edit one texture, then another, and so on. Typical asset files are rarely larger than a few KB, albeit with some notable exceptions (we will get back to some of those later).
Furthermore, we can take advantage of the external filesystem we have access to, and use it as a temporary storage where we can save the modified asset files before packing everything together into the final edited ROM. This way, we can make multiple modifications in a row before saving the new ROM, as is typically done in PC editors.
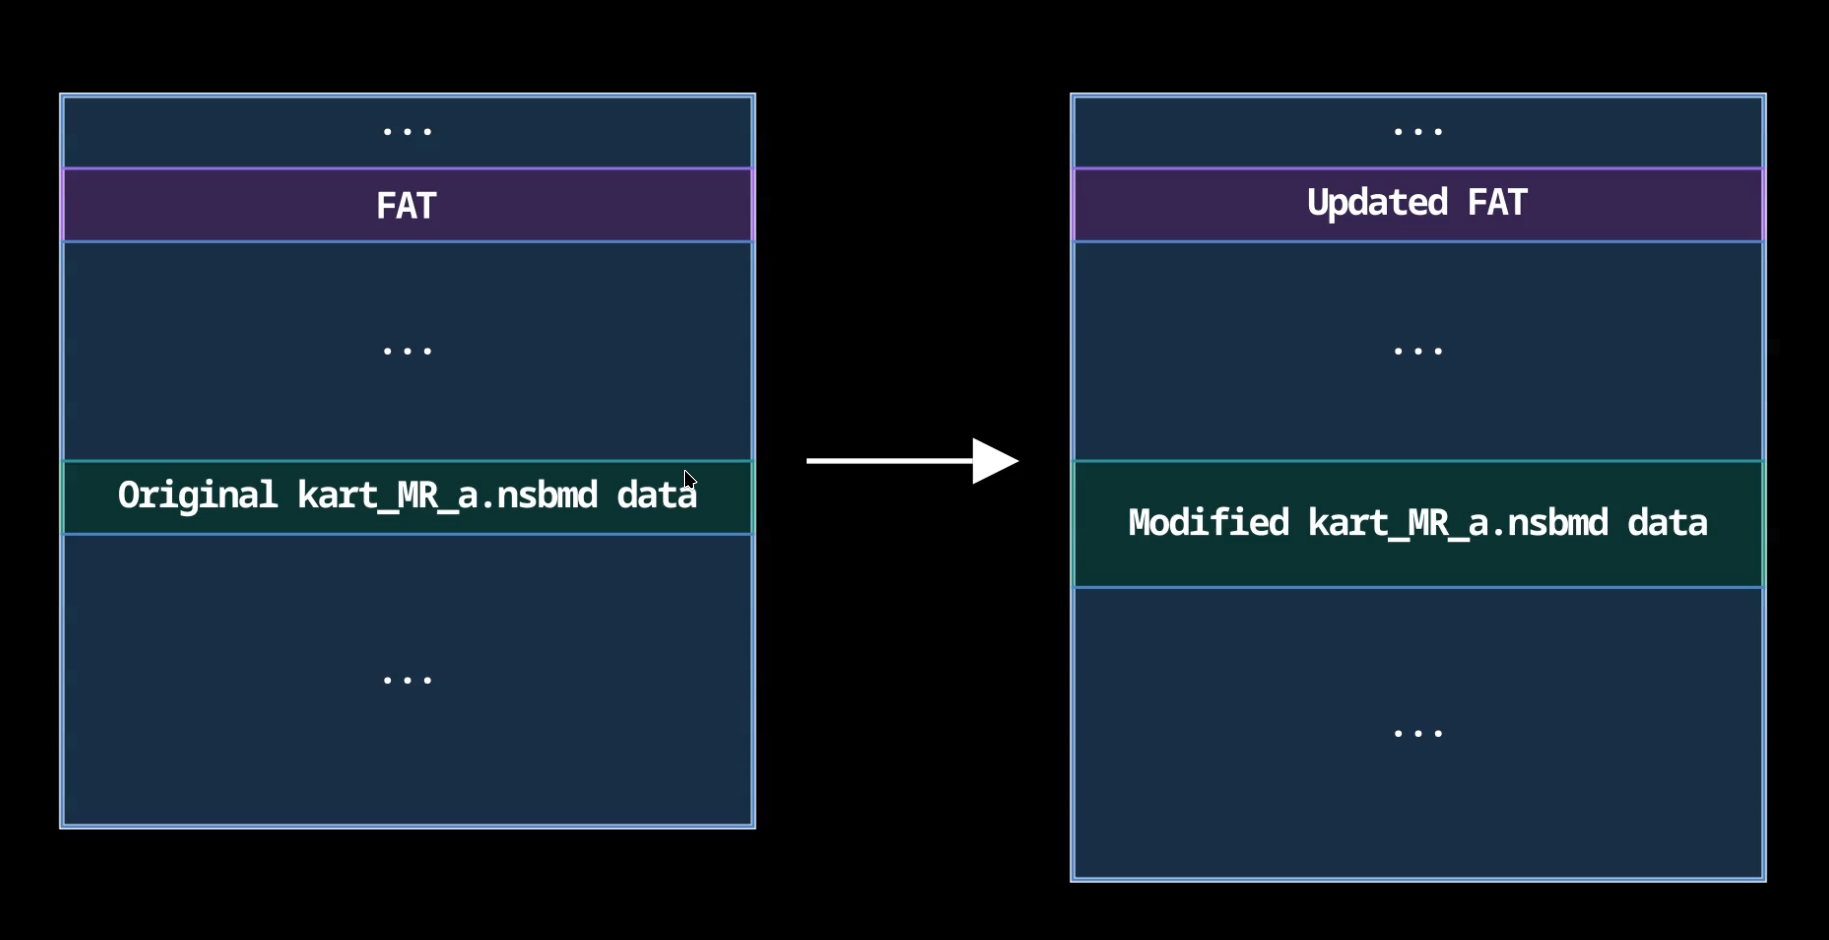
Let’s say we modify a single asset file named kart_MR_a.nsbmd, such that the modified file size is the exact same as the original asset file, despite this being rather unlikely. Since the file name, size and position in the filesystem tree hierarchy are not changed at all, nothing is there to be changed in the entire FNT region. Moreover, since the file size is also unchanged, the corresponding FAT entry doesn’t have to be updated. In other words, we only have to modify the corresponding file data, which is just a matter of copying the new data over the old one.
We can conceptually split the ROM space in three data chunks: two large unmodified chunks, and the modified file data section sitting between them. The first and last chunks can be directly copied from the original ROM, while this (comparatively very small) middle chunk is the only part to be changed in the new ROM. The entire saving procedure is nothing more than:
-
Copy the unmodified ROM into a new file, open the new file
-
Seek to the modified file data region (using offsets found in the corresponding FAT entry) and write the new file data over it
-
Close the new file: we’re done!
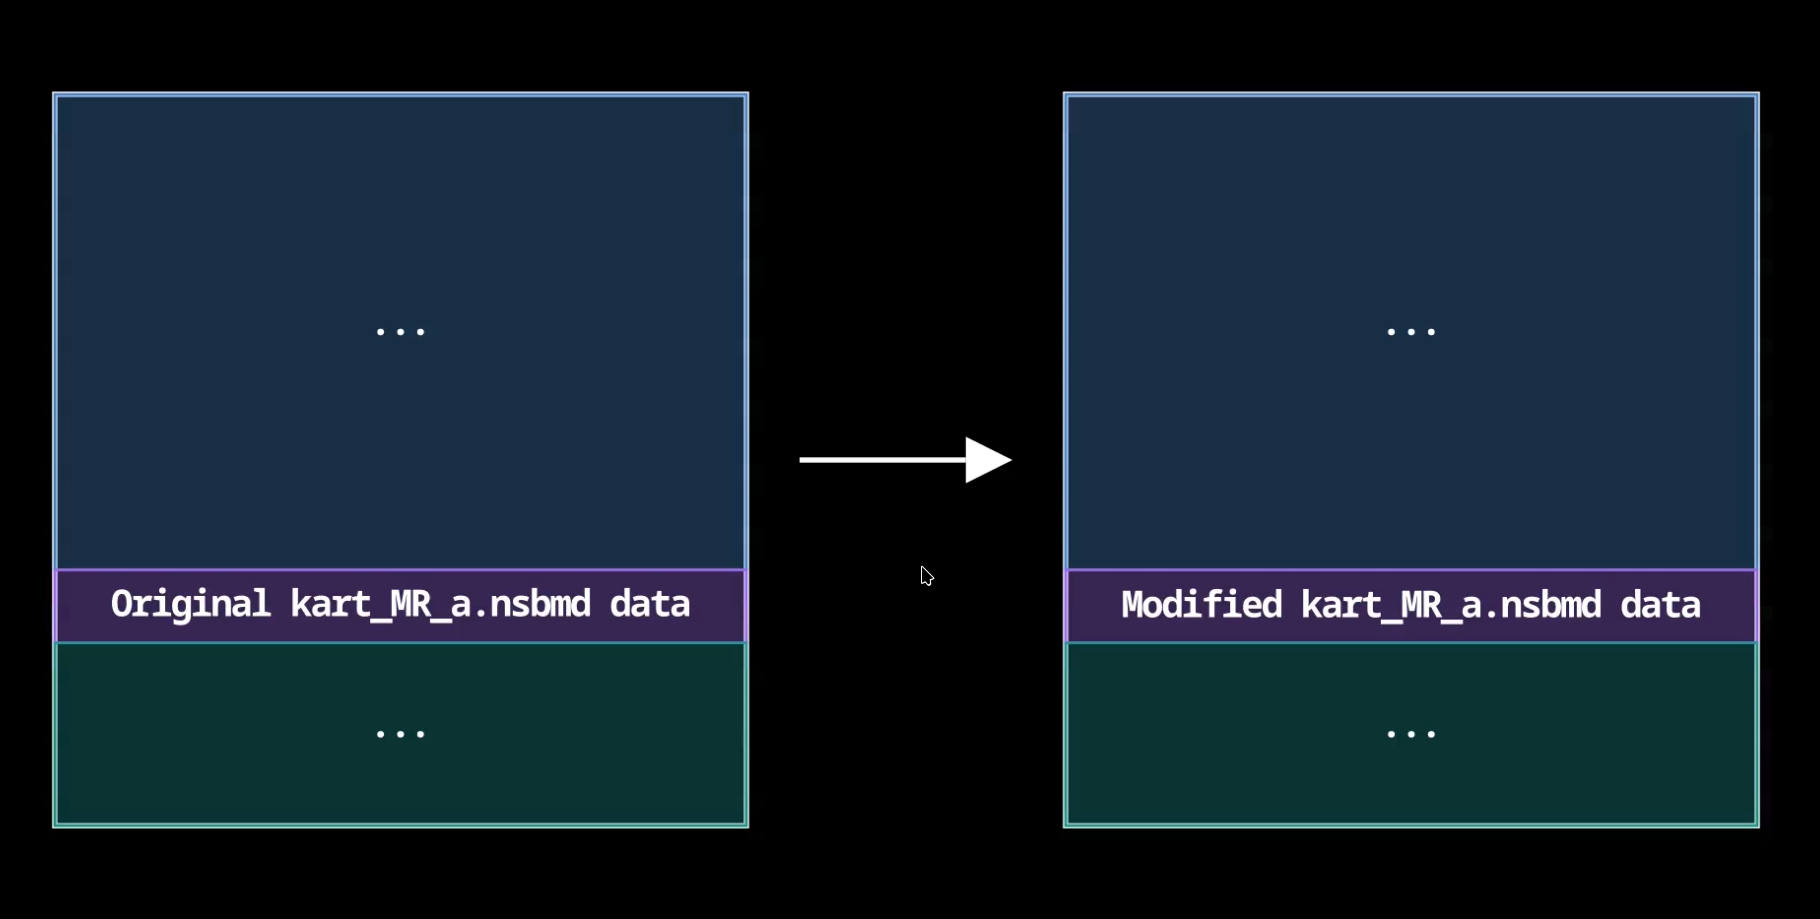
Thus, the only memory we had to keep around was the modified kart_MR_a.nsbmd data, typically nothing more than a few KB: no need to work with the entire ROM loaded in memory.
If you’re curious,
kart_MR_a.nsbmdis an actual asset corresponding to one of Mario’s default kart 3D models in Mario Kart DS.
Nevertheless, in general the modified file will be either smaller or larger than the original file. Can we somehow adapt this strategy to the general case? We actually can, by taking a careful look at which particular locations of the ROM data we need to tweak. Let’s take a closer look at NitroFS FAT and FNT tables.
FNT entries only contain the directory structure, and since we are not planning on renaming any asset files or moving them from/to other directories, the FNT is not to be changed at all and can be directly copied from the original ROM file.
Meanwhile, FAT entries just contain the location and size of each file’s data (or equivalently, start and end offsets):
struct FileAllocationTableEntry {
    u32 file_start_offset; // kart_MR_a.nsbmd
    u32 file_end_offset;   // kart_MR_a.nsbmd location + file size
};
For this reason, all the files placed before kart_MR_a.nsbmd will be unchanged, while everything afterwards (every file coming after) will be shifted, either upwards or downwards depending on whether the modified 3D model data is smaller or larger than the original. This also means that FAT entries of kart_MR_a.nsbmd and all the files coming after need to be updated to reflect the “shift” on the data.
The strategy is reminiscent of the previous case:
-
Copy the unmodified ROM into a new file, open the new file
-
Update FAT entries, write the new FAT section on the new ROM file
-
Copy the unmodified data between the FAT section and
kart_MR_a.nsbmddata -
Copy the new
kart_MR_a.nsbmddata -
Copy all remaining unmodified data
-
Close the new file: we’re done!
This strategy can be further generalized to support multiple asset file modifications at once. As we are done editing some asset file and we wish to move to another one, the modified asset file is temporarily saved into the external filesystem (at some temp directory) and we move to edit another asset file. In the end, having all the temporarily-saved asset files in the filesystem and not in memory, the strategy to assemble all the changes in a new ROM file is the following:
-
Copy the unmodified ROM into a new file, open the new file
-
Identify modified/unmodified ROM regions (depending on which files have been edited), adjust FAT offsets accordingly, write the new FAT section on the new ROM file
-
Copy corresponding unmodified/modified regions on the new ROM file, in order and in their correct final offsets
-
Close the new file: we’re done!
This scheme does work as intended, allowing for ROM editing on a device as limited as a Nintendo DS console, although it can get quite slow sometimes. After all, this procedure trades speed with memory usage, since it will be always faster to read/write the entire ROM data in bulk, but I guess I really didn’t have a choice if I wanted to bring this to reality.
Archives and compressed files
Another aspect worth mentioning are file archives. Many DS games use a standard SDK format known as NARC/ARC (aka Nitro Archive) to store multiple files. In fact, these archive files have a filesystem structure nearly identical to the ROM NitroFS filesystem. The basic NARC format is not compressed, but some games like Mario Kart DS store several related game assets (for instance, all assets of a specific game menu) as NARC files which are then compressed using LZ77 compression. Other games may compress big asset files using this scheme, as this compression habit is not limited to archives.
Since this compression format does not allow for random-access reading, the entire archive needs to be decompressed to read its contents, which forces us to load all the archive files in memory at once. This requirement is quite close to making NitroEdit run out-of-memory with certain big archives in some games, but for all the testing I did back when developing it, it was not problematic for most cases. After all, the actual games need to decompress the entire compressed files in memory in order to load the assets inside, so if they are not running out of memory and crashing in the process, then I should be fine too ;)
Let there be sound
Fortunately for us, sound assets are probably the most standardized of all: the majority of Nintendo DS games use the same standard SDK formats for sound files. Everything sound-related is stored in a SDAT (Sound DATa) file, typically called sound_data.sdat or minor variations of that, which is a kind-of archive of individual sound files. The sound assets inside come in several different flavors:
-
Sound SEQuence files (SSEQ): basically Nintendo’s own MIDI-like format, a sequence of notes and instructions (tempo, pitch adjustments and so on). Some conversion tools exist (although the process is not quite trivial, I believe the format is still not 100% understood) as well as audio players for this format, both in PC and in the console itself.
-
Sound WAVe files (SWAV): Nintendo’s analogue of the standard WAV audio format. As far as I can tell, conversions from/to SWAV and WAV are quite straightforward (unlike with sequence files).
-
STReaM files (STRM): I believe these are not far from wave files. They are an alternative wave format, less frequently found in games. In the few games where I’ve spotted the format, they are used for background music, unlike SWAV files which are typically sound effects.
-
Sound BaNK files (SBNK): similar to instrument formats like SF2, the file is essentially a listing of several SWAV files in the SDAT, each thus corresponding to an instrument. Sequence files are always played alongside a sound bank file (so that, you know, each note has a corresponding sound when played).
-
Sound Sequence ARchive files (SSAR): several SSEQ files packed together, usually due to belonging to a similar sound category (say level music in New Super Mario Bros., as opposed to world map music).
-
Sound Wave ARchive files (SWAR): several SWAV files packed together, usually for sound effects of the same kind (like all player noises in Mario Kart DS) or instrument sounds used to play SSEQ files.
Typical SDAT files are a few MB in size, but they don’t have to be loaded entirely in memory. By reading the header and jumping via offsets to the desired archive locations, you can easily navigate through all the sound files within the SDAT without any issues (in order words, the same as with the ROM itself).
So, what form of editing could I implement given all these sound formats? Making a SSEQ editor felt too ambitious, although it would definitely be fun to do as a future separate project (something like the music editors from Mario Paint or WarioWare DIY). In fact, making any kind of sound or music editor was far too ambitious for such a PoC.
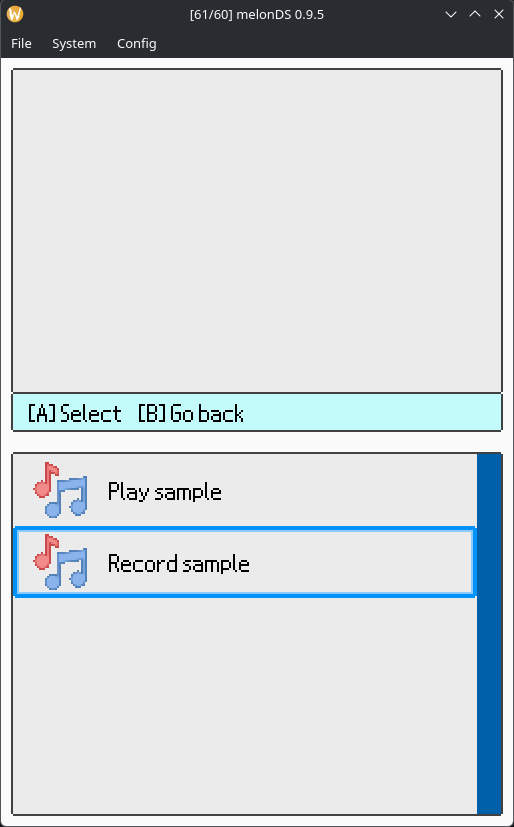
Luckily, an idea came to my mind while I was looking through libnds headers. For context, libnds is a well-established Nintendo DS homebrew C library, which I have used to code this PoC. I stumbled upon its microphone support, noticing that the raw PCM format in which it could record audio was the same raw sample data SWAV files contain: it’d be pretty fun to record some random thing on the microphone and save that data over some existing SWAV file in the game, wouldn’t it? This is the only sound feature I got to implemented in NitroEdit, along with playback of existing SWAV asset files.
Let there be light
DS game textures have somewhat different formats from the PNG, JPG or BMP files we typically have around. While image files can be qualitatively described as the encoding of a matrix of pixels, each with their own color (although usually compressed with efficient techniques rather than storing the entire grid of colors), DS textures are split in two, sometimes three separate files: character files, palette files and optionally screen files.
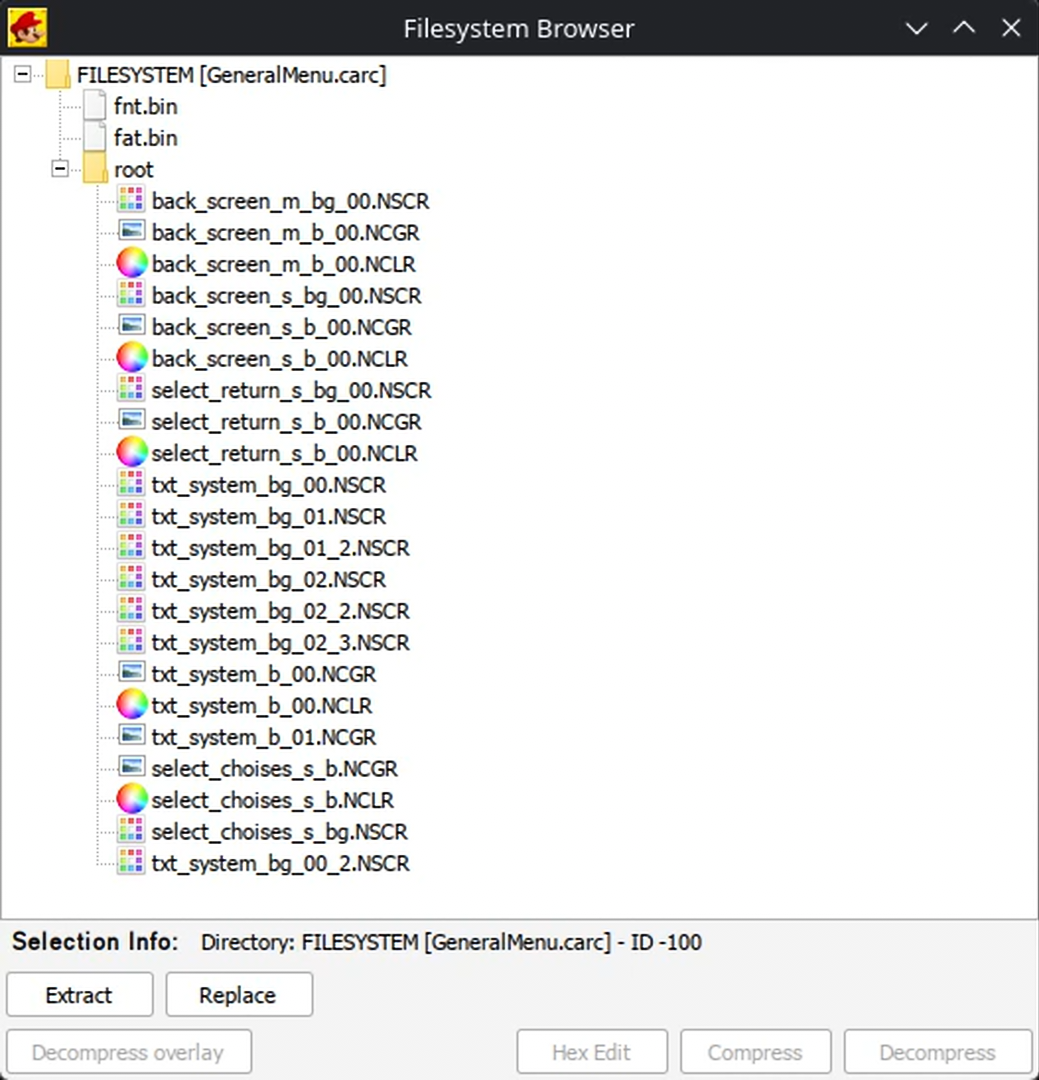
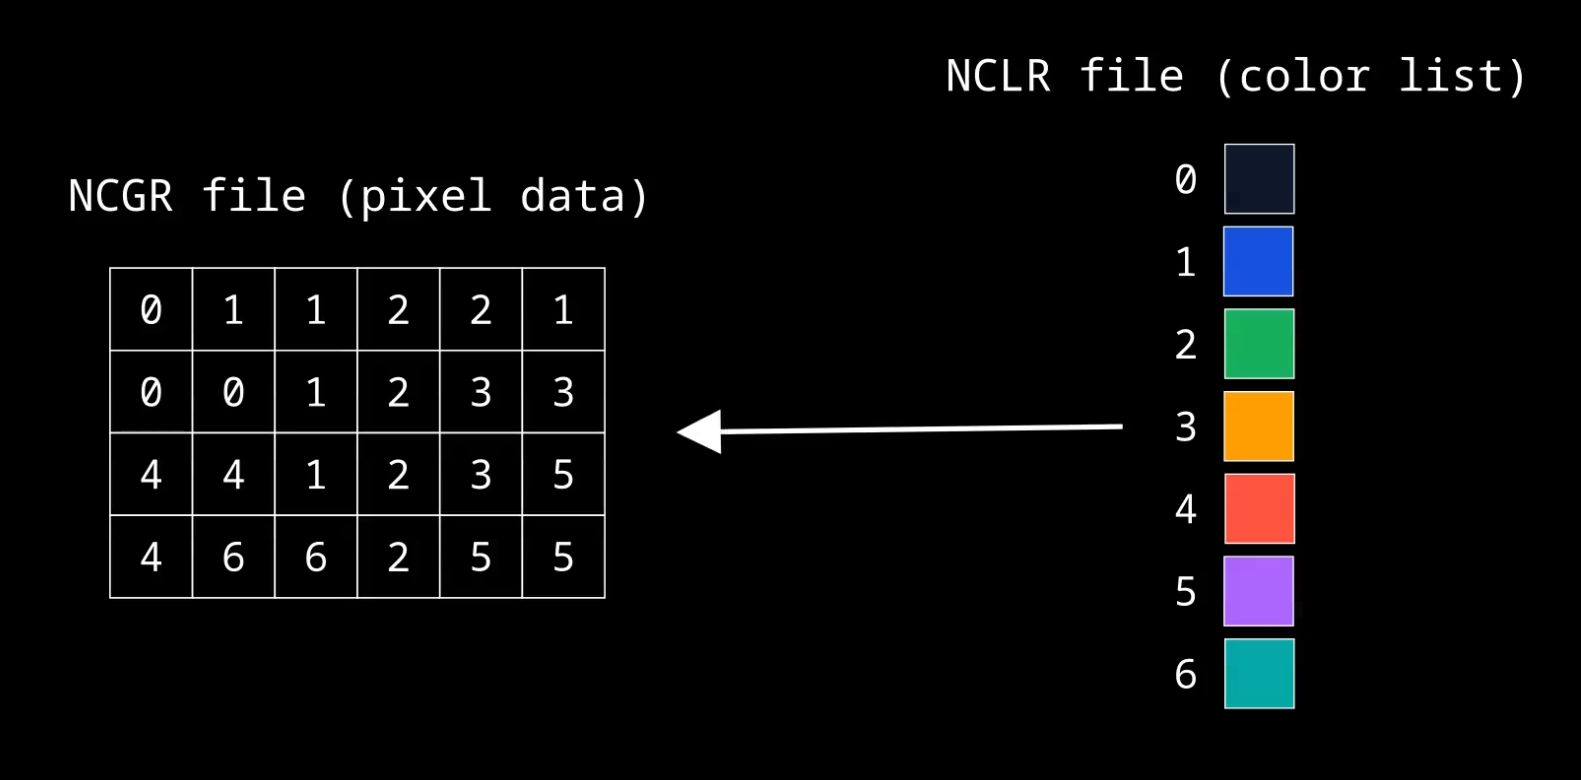
Character files (Nitro Character Graphics Resource, NCGR) contain the “grid” of the texture, but instead of containing the color of each pixel, they instead contain an index value that can be used to get the pixel color from a corresponding palette file (Nitro CoLoR, NCLR), which is not much more than a list of colors.
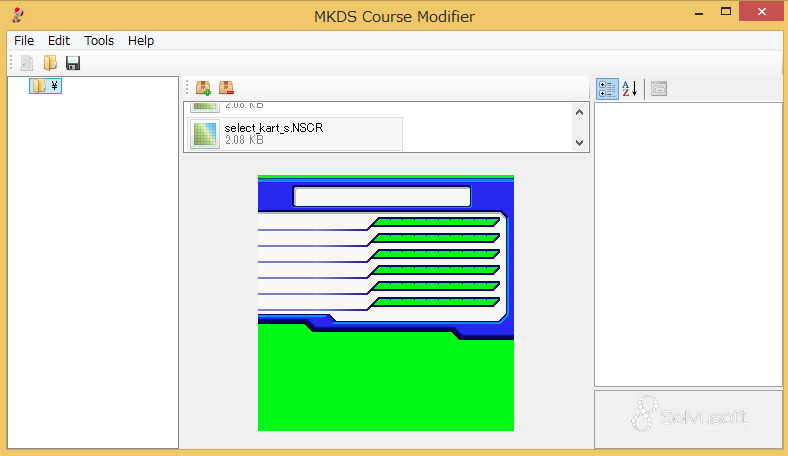
A screen file (Nitro SCReen, NSCR), on the other hand, is a less trivial format, but think of it as a tilemap using certain blocks from the corresponding character+palette pair as tile data, typically used for backgrounds. While not as standardized as sound formats, these SDK character file formats are used by a wide variety of DS games, specially in the most famous ones.
By the way, can you guess why the word “Nitro” appears so often in most of the file formats mentioned so far?
Why are DS graphics prepared in this way? Can you take a guess? Well, it’s a matter of efficiency. In the dedicated video RAM (VRAM) and palette memory of the console, the raw data formats expected by these regions are the same ones used by character and palette files, such that graphics can be loaded on the screen by a fast, DMA-accelerated copy of file data to the corresponding memory regions. In other words: when developers use the SDK graphics tools to generate textures and sprites, these are generated in specially designed character/palette data formats that can be loaded onto game memory as fast as possible.
For instance, this is reverse-engineered code from Mario Kart DS that loads the trio of graphics files corresponding to the game initial screen. The data inside the asset files is directly copied to each dedicated graphics memory region:
Regarding colors, palette files use 16-bit RGB565 coloring, for a total of 2^16=65536 possible colors (compare that to the 2^32=16777216 colors we have with the typical 32-bit RGBA8888). However, textures can have color depths of only 4 or 8 bits-per-pixel (bpp), meaning that the total number of colors in the palette is either 2^4=16 or 2^8=256: you have 65536 colors to pick from, but you can only pick a few of them for your texture palette. This limitation can allow for a tighter data format: in the case of 4bpp textures, a single byte of character data can be used to store two pixels (4 bits each for a total of 8 bits), thus using only N/2 bytes to store the character data of N total pixels.
Moreover, transparency is achieved by treating the first color in the palette file as a pseudovalue for the “transparent” color, so in practice only 15 (or 255) colors are usable in the palette.
In order to edit these textures, as well as the ROM game icon, I designed a simple pixel editor for NitroEdit. I also had to include a basic file selection system, since I need to load character+palette (and optionally +screen) data together. Check the editor in action:
Let there be words
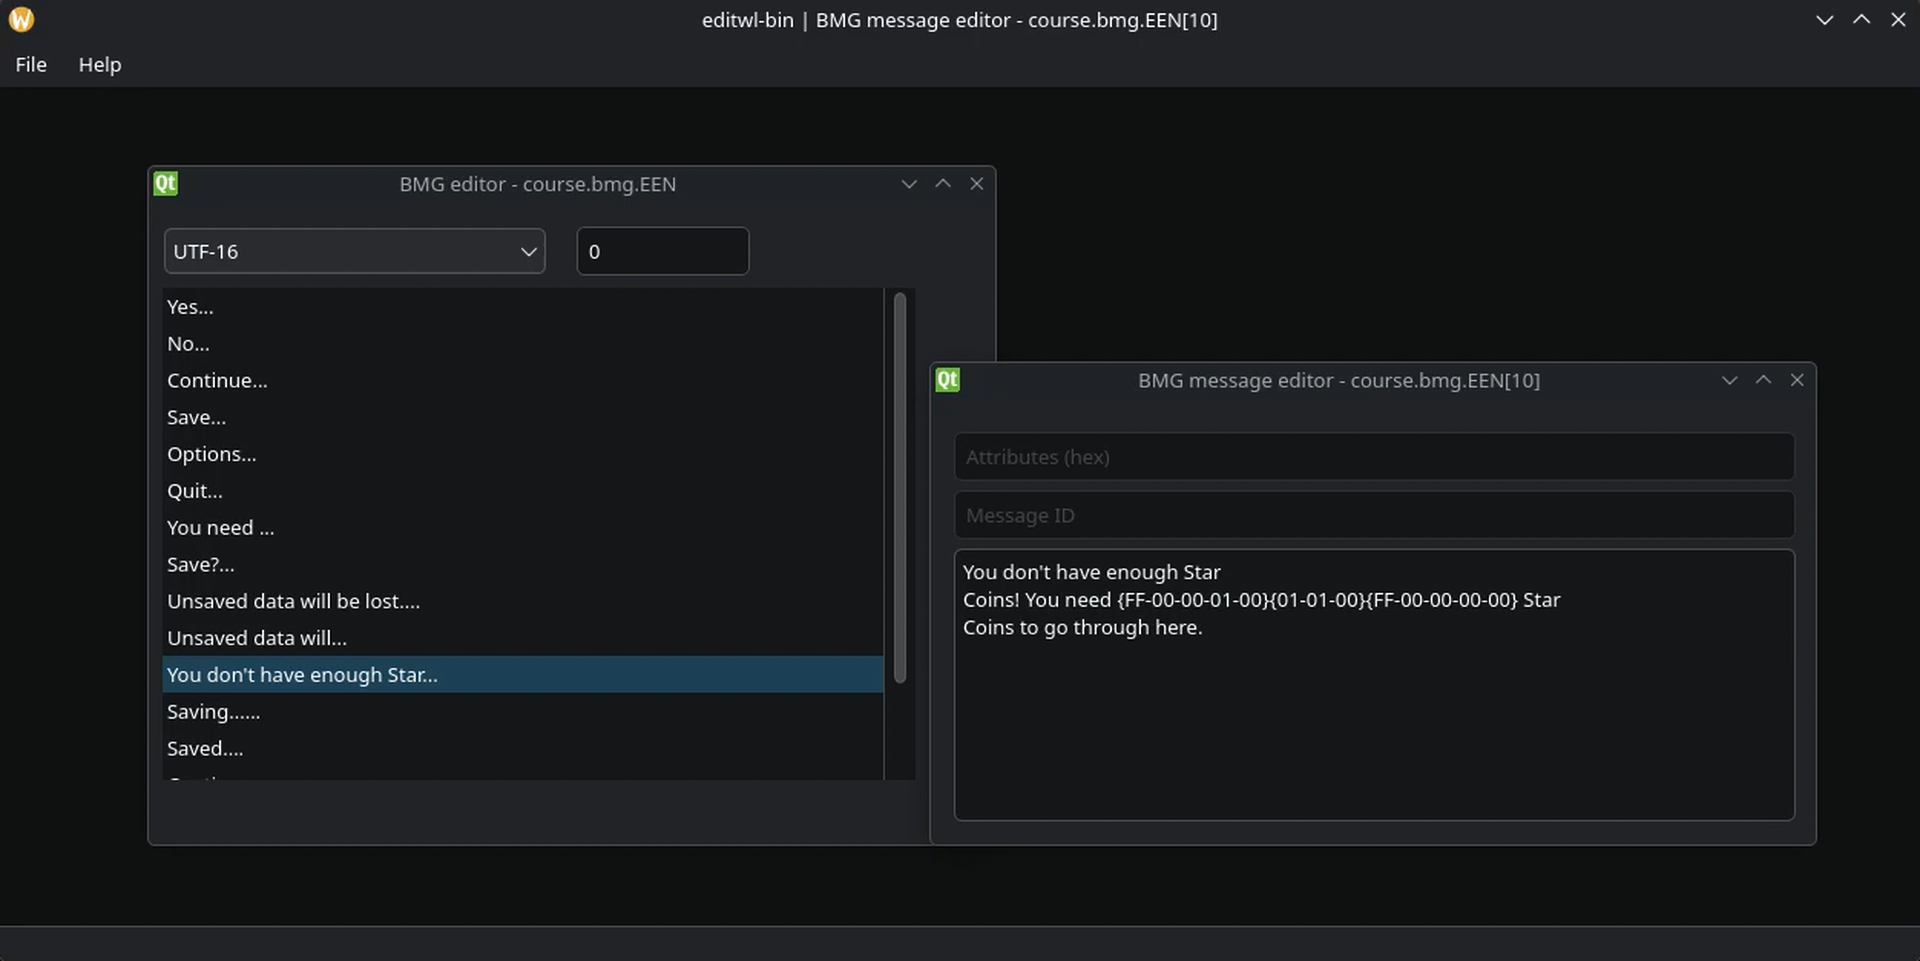
Unlike sound or graphics assets, there doesn’t seem to be a clear standard for text/dialog files. However, Binary MessaGe (BMG) files are used in several well-known games, such as Mario Kart DS, Nintendogs, Super Mario 64 DS and New Super Mario Bros., so it was an interesting file format to support (as well as less complicated than sound or graphics). BMG files are nothing more than a list of strings in a specific chosen text encoding (usually ASCII or UTF-8), albeit with special escape codes that allow for color changes (multicolored text), argument formatting or other special game-specific features. I have done some minor reverse-engineering on the BMG loading code of different DS games in the past, and I’m not still sure if the format is an SDK standard format or not, since the code changes noticeably from game to game.
These are the contents of some Mario Kart DS BMG file, viewed in a work-in-progress GUI tool of mine:
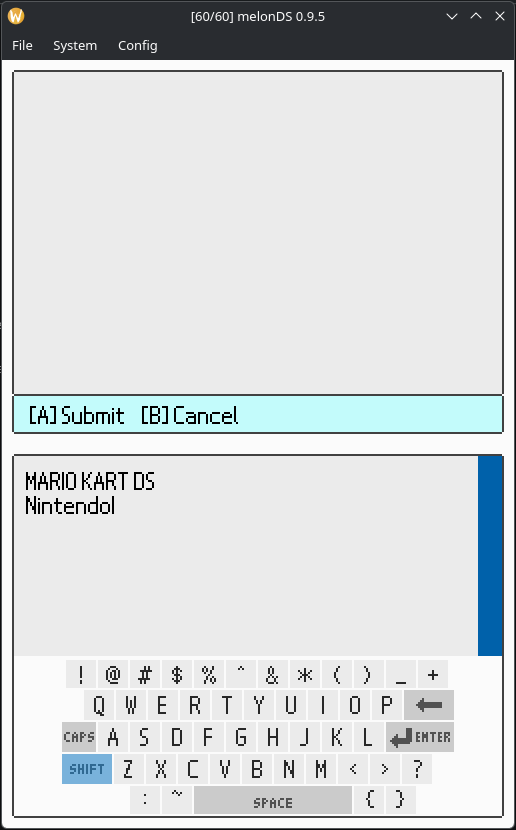
Furthermore, we also have the main ROM texts: the ROM game code (which is more of a character code than a title to be displayed) and the actual game titles for each of the supported languages of the Nintendo DS. In order to edit all these titles, as well as BMG files, I implemented a simple touch-based text editor in NitroEdit.
Developing the PoC
I coded NitroEdit using C++ and the already mentioned libnds C homebrew library. Since the only DS homebrew stuff I had previously coded were random experiments many, many years ago, this experience forced me to familiarize with libnds from scratch once again. I first made the overall ROM editing and saving functionality, in order to ensure it worked fine before getting into the not-so-trivial territory of making a nice GUI. This first “crude” editor was CLI-based, a console-based interface which barely made the editor controllable. I relied on OOP and shared pointers of different file types to easily pass around loaded files from one menu to the other, in order to avoid dealing with manual memory disposal as much as possible, which I believe was a good choice.
Obviously, the previously explained quirks of graphics memory apply to this homebrew as well. This wasn’t going to be your typical PC application, where you can directly do something like draw(“texture.png”, 100, 100) for the background and any icons or textures you wish to use.
In fact, I still haven’t said anything about sprites. If you want to have movable objects showing in your screen, you need to work with the DS Object Attribute Memory (OAM), which feels really limited compared to any modern device graphics, since sprite sizes are limited to a few, fixed dimensions (32x16 pixels, 32x32, 32x64 and so on) and the number of objects allocatable in the OAM is limited as well. For this reason, as I played around with libnds, I gradually made a nice UI wrapper around libnds, with a Sprite struct that automatically reserves as many OAM slots as possible to fit the graphics I want to load in chunks, as well as a Background struct.
I also made the now kind-of regrettable decision of using PNG files for the editor’s textures themselves, which means having to read and decode the PNG data into the raw RGB565 palette and pixels that the graphics memory expects. This is, partly, why all transitions have a slight lag when loading, since all the graphics of the new menu have to be decoded from PNG data. If I ever were to continue expanding this PoC, I would definitely consider using some tool to pre-convert my PNG assets to raw graphics data files on the compilation process, or make it myself if no such tool exists.
While libnds provides its built-in keyboard, I eventually decided it was better to make my own, since this default keyboard is rather limited, and not the best considering the graphics and video RAM layout I was using in the project by that point. This homemade keyboard consists of two textures, one with all keys pressed and another one with all the keys unpressed. Initially the unpressed-key texture is loaded, and when a key is pressed, the corresponding image data of the pressed key is copied directly onto the background raw pixels, and the same is done after releasing the key. The rest of the code is a matter of associating each rectangular region in the keyboard with an action (inserting the corresponding character on the string being modified, deleting the currently positioned character, and so on).
Since I quite like the DS system font used in PictoChat and other places in the BIOS, I found a TTF font that replicated it and used stb_truetype to load it. As with the PDF assets, this is quite overkill for DS homebrew. To be fair, I didn’t consider their implications back when I was making the GUI. If I were to come back to this PoC, I would use the font resource linked above to generate bitmap font data, with each glyph pixels ready to be copied over other graphics data (which is not far from what DS games use with the frequently-used NFTR font asset files).
Showcasing the results
These are some examples of what you could do using NitroEdit.
- Editing the name of a course in Mario Kart DS:
- Painting over the Mario Kart DS title logo:
Concluding remarks
As you can probably tell from this post, I quite enjoy playing around with the Nintendo DS console and games in a more technical side. In fact, I feel now a bit tempted to get back on this PoC (or on the mentioned idea of a SSEQ editor) after having to revisit all the subtleties of making this PoC to write this post, since this is a project I made 5 years ago.
If you want to find more information on all the technical aspects I’ve just grasped in this post, I recommend the GBATEK docs as one of the best sources for nearly everything, even if some specs may be outdated compared to other sources.
Would anyone use this tool in practice? No, since in 99% of the cases where you wish to modify a game ROM, you will have a computer nearby, probably right in front of your eyes. This is, after all, what proof-of-concept ideas are: you consider some bizarre, niche idea, and you make it come to fruition, simply because it’s a fun experiment to play around with, just to show it can be done. Heck, you even get to learn a bunch of new things about “old” systems and the art of manipulating various types of data. ¿What else do you need to jump into such a project?
No LLM aid was used to write this post, nor to code this PoC ;)